How to Replace/Change Colors in Adobe Photoshop Elements || Color Replacement in Adobe Photoshop Elements

Color Replacement in Adobe Photoshop Elements is very simple and one of the popular functionality in this wonderful software for Digital Image Processing. Let's have a quick round of steps to better understand Color Replacement workflow. This effectively helps in changing a particular range of color shades to other shades. (An old post migrated from http://photoshopelementsbyadobe.blogspot.in)

Color Replacement in Adobe Photoshop Elements is very simple and one of the popular functionality in this wonderful software for Digital Image Processing. Let's have a quick round of steps to better understand Color Replacement workflow. This effectively helps in changing a particular range of color shades to other shades.1. As a starting point, just open the photograph which needs Color Replacement or Changes and go to Enhance Menu.2. Under Enhance Menu, go to 'Adjust Color' and select 'Replace Color...3. Just have a look at image below, which shows 'Replace Color' dialog with different options. For now, just have a look at all the options and try to make out the usage4. Now click on Color Picker tool, which is first pen in the dialog and click on the color which you want to change in your Photograph. Highlighted area in the image below shows Pen on right and selected color on left. After this selection, you will notice two changes in this dialog - One is change in color on right side. Color of two squares will change to the one you have selected. Second will be change is black & white rectangle. If you don't see this black & white rectangle, then ensure that 'Selection' is checked.5. Now you have to fine tune the selection. Fuzziness slider helps in increasing the color range we want to change/replace. If we move fuzziness slider towards right, it increases range of color tone. Just note the black & white rectangle in image below & above. Now whole flower looks white here, which indicates that this whole region will be impacted by color replacement.6. Now go to the bottom section and click on Result Color square. It will open up 'Select Target Color' dialog, where you have a to select the color you want to apply in selected region of your photograph. Although below selected color doesn't look good but I selected it for showing the effect clearly. When done, Click OK in 'Select Target Color' dialog.7. Note that HUE, SATURATION and LIGHTNESS values have changed in this dialog. This also indicates that shades can directly be handled through these three sliders instead of Color Selection dialog.Please do some experiments with Color Replacement in Adobe Photoshop Elements and feel free to ask specific queries through comments here.

1. As a starting point, just open the photograph which needs Color Replacement or Changes and go to Enhance Menu.


2. Under Enhance Menu, go to 'Adjust Color' and select 'Replace Color...'

3. Just have a look at image below, which shows 'Replace Color' dialog with different options. For now, just have a look at all the options and try to make out the usage.

Color Replacement in Adobe Photoshop Elements is very simple and one of the popular functionality in this wonderful software for Digital Image Processing. Let's have a quick round of steps to better understand Color Replacement workflow. This effectively helps in changing a particular range of color shades to other shades.1. As a starting point, just open the photograph which needs Color Replacement or Changes and go to Enhance Menu.2. Under Enhance Menu, go to 'Adjust Color' and select 'Replace Color...3. Just have a look at image below, which shows 'Replace Color' dialog with different options. For now, just have a look at all the options and try to make out the usage4. Now click on Color Picker tool, which is first pen in the dialog and click on the color which you want to change in your Photograph. Highlighted area in the image below shows Pen on right and selected color on left. After this selection, you will notice two changes in this dialog - One is change in color on right side. Color of two squares will change to the one you have selected. Second will be change is black & white rectangle. If you don't see this black & white rectangle, then ensure that 'Selection' is checked.5. Now you have to fine tune the selection. Fuzziness slider helps in increasing the color range we want to change/replace. If we move fuzziness slider towards right, it increases range of color tone. Just note the black & white rectangle in image below & above. Now whole flower looks white here, which indicates that this whole region will be impacted by color replacement.6. Now go to the bottom section and click on Result Color square. It will open up 'Select Target Color' dialog, where you have a to select the color you want to apply in selected region of your photograph. Although below selected color doesn't look good but I selected it for showing the effect clearly. When done, Click OK in 'Select Target Color' dialog.7. Note that HUE, SATURATION and LIGHTNESS values have changed in this dialog. This also indicates that shades can directly be handled through these three sliders instead of Color Selection dialog.Please do some experiments with Color Replacement in Adobe Photoshop Elements and feel free to ask specific queries through comments here.

4. Now click on Color Picker tool, which is first pen in the dialog and click on the color which you want to change in your Photograph. Highlighted area in the image below shows Pen on right and selected color on left. After this selection, you will notice two changes in this dialog - One is change in color on right side. Color of two squares will change to the one you have selected. Second will be change is black & white rectangle. If you don't see this black & white rectangle, then ensure that 'Selection' is checked.

Color Replacement in Adobe Photoshop Elements is very simple and one of the popular functionality in this wonderful software for Digital Image Processing. Let's have a quick round of steps to better understand Color Replacement workflow. This effectively helps in changing a particular range of color shades to other shades.1. As a starting point, just open the photograph which needs Color Replacement or Changes and go to Enhance Menu.2. Under Enhance Menu, go to 'Adjust Color' and select 'Replace Color...3. Just have a look at image below, which shows 'Replace Color' dialog with different options. For now, just have a look at all the options and try to make out the usage4. Now click on Color Picker tool, which is first pen in the dialog and click on the color which you want to change in your Photograph. Highlighted area in the image below shows Pen on right and selected color on left. After this selection, you will notice two changes in this dialog - One is change in color on right side. Color of two squares will change to the one you have selected. Second will be change is black & white rectangle. If you don't see this black & white rectangle, then ensure that 'Selection' is checked.5. Now you have to fine tune the selection. Fuzziness slider helps in increasing the color range we want to change/replace. If we move fuzziness slider towards right, it increases range of color tone. Just note the black & white rectangle in image below & above. Now whole flower looks white here, which indicates that this whole region will be impacted by color replacement.6. Now go to the bottom section and click on Result Color square. It will open up 'Select Target Color' dialog, where you have a to select the color you want to apply in selected region of your photograph. Although below selected color doesn't look good but I selected it for showing the effect clearly. When done, Click OK in 'Select Target Color' dialog.7. Note that HUE, SATURATION and LIGHTNESS values have changed in this dialog. This also indicates that shades can directly be handled through these three sliders instead of Color Selection dialog.Please do some experiments with Color Replacement in Adobe Photoshop Elements and feel free to ask specific queries through comments here.

5. Now you have to fine tune the selection. Fuzziness slider helps in increasing the color range we want to change/replace. If we move fuzziness slider towards right, it increases range of color tone. Just note the black & white rectangle in image below & above. Now whole flower looks white here, which indicates that this whole region will be impacted by color replacement.

Color Replacement in Adobe Photoshop Elements is very simple and one of the popular functionality in this wonderful software for Digital Image Processing. Let's have a quick round of steps to better understand Color Replacement workflow. This effectively helps in changing a particular range of color shades to other shades.1. As a starting point, just open the photograph which needs Color Replacement or Changes and go to Enhance Menu.2. Under Enhance Menu, go to 'Adjust Color' and select 'Replace Color...3. Just have a look at image below, which shows 'Replace Color' dialog with different options. For now, just have a look at all the options and try to make out the usage4. Now click on Color Picker tool, which is first pen in the dialog and click on the color which you want to change in your Photograph. Highlighted area in the image below shows Pen on right and selected color on left. After this selection, you will notice two changes in this dialog - One is change in color on right side. Color of two squares will change to the one you have selected. Second will be change is black & white rectangle. If you don't see this black & white rectangle, then ensure that 'Selection' is checked.5. Now you have to fine tune the selection. Fuzziness slider helps in increasing the color range we want to change/replace. If we move fuzziness slider towards right, it increases range of color tone. Just note the black & white rectangle in image below & above. Now whole flower looks white here, which indicates that this whole region will be impacted by color replacement.6. Now go to the bottom section and click on Result Color square. It will open up 'Select Target Color' dialog, where you have a to select the color you want to apply in selected region of your photograph. Although below selected color doesn't look good but I selected it for showing the effect clearly. When done, Click OK in 'Select Target Color' dialog.7. Note that HUE, SATURATION and LIGHTNESS values have changed in this dialog. This also indicates that shades can directly be handled through these three sliders instead of Color Selection dialog.Please do some experiments with Color Replacement in Adobe Photoshop Elements and feel free to ask specific queries through comments here.
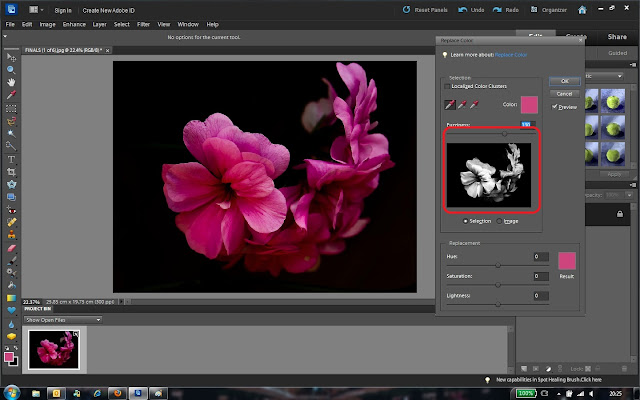
6. Now go to the bottom section and click on Result Color square. It will open up 'Select Target Color' dialog, where you have a to select the color you want to apply in selected region of your photograph. Although below selected color doesn't look good but I selected it for showing the effect clearly. When done, Click OK in 'Select Target Color' dialog.

Color Replacement in Adobe Photoshop Elements is very simple and one of the popular functionality in this wonderful software for Digital Image Processing. Let's have a quick round of steps to better understand Color Replacement workflow. This effectively helps in changing a particular range of color shades to other shades.1. As a starting point, just open the photograph which needs Color Replacement or Changes and go to Enhance Menu.2. Under Enhance Menu, go to 'Adjust Color' and select 'Replace Color...3. Just have a look at image below, which shows 'Replace Color' dialog with different options. For now, just have a look at all the options and try to make out the usage4. Now click on Color Picker tool, which is first pen in the dialog and click on the color which you want to change in your Photograph. Highlighted area in the image below shows Pen on right and selected color on left. After this selection, you will notice two changes in this dialog - One is change in color on right side. Color of two squares will change to the one you have selected. Second will be change is black & white rectangle. If you don't see this black & white rectangle, then ensure that 'Selection' is checked.5. Now you have to fine tune the selection. Fuzziness slider helps in increasing the color range we want to change/replace. If we move fuzziness slider towards right, it increases range of color tone. Just note the black & white rectangle in image below & above. Now whole flower looks white here, which indicates that this whole region will be impacted by color replacement.6. Now go to the bottom section and click on Result Color square. It will open up 'Select Target Color' dialog, where you have a to select the color you want to apply in selected region of your photograph. Although below selected color doesn't look good but I selected it for showing the effect clearly. When done, Click OK in 'Select Target Color' dialog.7. Note that HUE, SATURATION and LIGHTNESS values have changed in this dialog. This also indicates that shades can directly be handled through these three sliders instead of Color Selection dialog.Please do some experiments with Color Replacement in Adobe Photoshop Elements and feel free to ask specific queries through comments here.
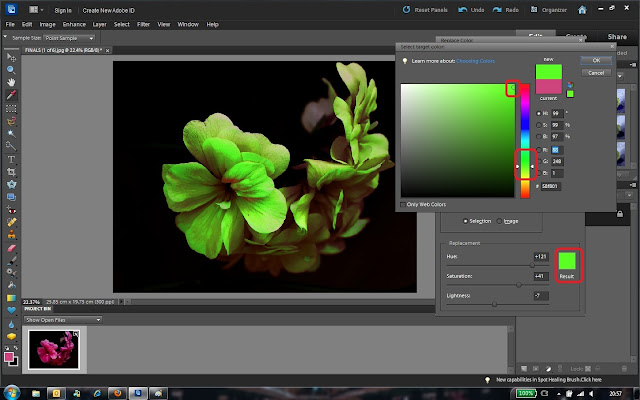
7. Note that HUE, SATURATION and LIGHTNESS values have changed in this dialog. This also indicates that shades can directly be handled through these three sliders instead of Color Selection dialog.

Color Replacement in Adobe Photoshop Elements is very simple and one of the popular functionality in this wonderful software for Digital Image Processing. Let's have a quick round of steps to better understand Color Replacement workflow. This effectively helps in changing a particular range of color shades to other shades.1. As a starting point, just open the photograph which needs Color Replacement or Changes and go to Enhance Menu.2. Under Enhance Menu, go to 'Adjust Color' and select 'Replace Color...3. Just have a look at image below, which shows 'Replace Color' dialog with different options. For now, just have a look at all the options and try to make out the usage4. Now click on Color Picker tool, which is first pen in the dialog and click on the color which you want to change in your Photograph. Highlighted area in the image below shows Pen on right and selected color on left. After this selection, you will notice two changes in this dialog - One is change in color on right side. Color of two squares will change to the one you have selected. Second will be change is black & white rectangle. If you don't see this black & white rectangle, then ensure that 'Selection' is checked.5. Now you have to fine tune the selection. Fuzziness slider helps in increasing the color range we want to change/replace. If we move fuzziness slider towards right, it increases range of color tone. Just note the black & white rectangle in image below & above. Now whole flower looks white here, which indicates that this whole region will be impacted by color replacement.6. Now go to the bottom section and click on Result Color square. It will open up 'Select Target Color' dialog, where you have a to select the color you want to apply in selected region of your photograph. Although below selected color doesn't look good but I selected it for showing the effect clearly. When done, Click OK in 'Select Target Color' dialog.7. Note that HUE, SATURATION and LIGHTNESS values have changed in this dialog. This also indicates that shades can directly be handled through these three sliders instead of Color Selection dialog.Please do some experiments with Color Replacement in Adobe Photoshop Elements and feel free to ask specific queries through comments here.

There are some other controls in this dialog to add or remove some selected shades of a color. Please do some experiments with Color Replacement in Adobe Photoshop Elements and feel free to ask specific queries through comments here.

Trending Post Today !

How to reach Kasol/Malana and top things to do around this stunning hill-station of Himalayan State of India

Main places to see & Top things to do around Dalhousie : Stunning Hill Station in Himalayan State of India