How to achieve Depth of Field Effect in Adobe Photoshop Elements || Guided Edits in Adobe Photsohop Elements

There is a Guided Edit in Adobe Photoshop Elements, which is called as 'Depth of Field'. By looking at above results you might have noticed that it is nowhere near to Depth of Field effect we get with Cameras. So as of now, let's call it partial bur technique which helps in achieving results near to Shallow Depth of Field. Guided Edits in Adobe Photoshop Elements are most easy to use effects with step-by-step guidelines. Let's see how Depth of Field Guided Edit work and perform... Let's go step by step and also learn things we need to be aware of during different steps1. Open a photograph in Adobe Photoshop Elements Editor and go to Guided Edit Panel. (Please see the image below and make sure that this is how your workspace look like...)2. There are various sections under Guided Edit Panel in Adobe Photoshop Elements. Select 'Lens Effect' and Click on 'Depth of Field' . The image shown below shows the refreshed panel after click Depth of Field Guided Edit3. Now in Depth of Field Guided Edit, there are two different options to go for. In this article we will explore the first one and simple one :) . Names of these two effects are - SIMPLE and CUSTOM (Can you guess what these would be?) . To me first one sounds something easy and basic, while the second one should be something exciting :). Let's see if I am write or wrong. So click on Simple, the first option and proceed. It should open following screen on right side of Adobe Photoshop Elements - Editor.4. Click on 'Add Blur', although it will give scary effect of blur on first go, but don't worry. It will gradually move towards what you expect out of it. So first step will add blur to your photograph, like what you see in following image.5. This is most critical step, where we have to be very careful to get near to best results. There is a gradient marker and we have to mark an area which should be in focus. First time, it's difficult to guess the effect it would give but try and refine gradually. As a small tip, mark the area towards the middle of the main subject and it will automatically take care of surrounding regions. At times, this require re-measurements again n again. So try it and reach the best possible you can get out of it6. This is how it will look and blur effect can be intensified by the slider shown in step-3. I have changed blur a bit and happy with what it's showing right now.7. When done with this selective blur effect in Adobe Photoshop Elements, click  Done and come out of this workflow. We clicked on the drop-down below the image an select Before-After horizontal View.This is how it would shown the original Photograph and the final result. Hope you are happy with results. At times, this doesn't give good results with subject having non-uniformed shapes, which is the usual thing. We shall discuss the other trick to handle such subjects with Custom Depth of Field Effect soon.This is original Photograph used in this articlFinal Result we got through Simple Depth of Field Guided Edit in Adobe Photoshop Elements.  Next article would cover Custom Depth of Field Technique to deal with all types of shapes of main subject.

 There is a Guided Edit in Adobe Photoshop Elements, which is called as 'Depth of Field'. By looking at above results you might have noticed that it is nowhere near to Depth of Field effect we get with Cameras. So as of now, let's call it partial bur technique which helps in achieving results near to Shallow Depth of Field. Guided Edits in Adobe Photoshop Elements are most easy to use effects with step-by-step guidelines. Let's see how Depth of Field Guided Edit work and perform... Let's go step by step and also learn things we need to be aware of during different steps...


1. Open a photograph in Adobe Photoshop Elements Editor and go to Guided Edit Panel. (Please see the image below and make sure that this is how your workspace look like...)

There is a Guided Edit in Adobe Photoshop Elements, which is called as 'Depth of Field'. By looking at above results you might have noticed that it is nowhere near to Depth of Field effect we get with Cameras. So as of now, let's call it partial bur technique which helps in achieving results near to Shallow Depth of Field. Guided Edits in Adobe Photoshop Elements are most easy to use effects with step-by-step guidelines. Let's see how Depth of Field Guided Edit work and perform... Let's go step by step and also learn things we need to be aware of during different steps1. Open a photograph in Adobe Photoshop Elements Editor and go to Guided Edit Panel. (Please see the image below and make sure that this is how your workspace look like...)2. There are various sections under Guided Edit Panel in Adobe Photoshop Elements. Select 'Lens Effect' and Click on 'Depth of Field' . The image shown below shows the refreshed panel after click Depth of Field Guided Edit3. Now in Depth of Field Guided Edit, there are two different options to go for. In this article we will explore the first one and simple one :) . Names of these two effects are - SIMPLE and CUSTOM (Can you guess what these would be?) . To me first one sounds something easy and basic, while the second one should be something exciting :). Let's see if I am write or wrong. So click on Simple, the first option and proceed. It should open following screen on right side of Adobe Photoshop Elements - Editor.4. Click on 'Add Blur', although it will give scary effect of blur on first go, but don't worry. It will gradually move towards what you expect out of it. So first step will add blur to your photograph, like what you see in following image.5. This is most critical step, where we have to be very careful to get near to best results. There is a gradient marker and we have to mark an area which should be in focus. First time, it's difficult to guess the effect it would give but try and refine gradually. As a small tip, mark the area towards the middle of the main subject and it will automatically take care of surrounding regions. At times, this require re-measurements again n again. So try it and reach the best possible you can get out of it6. This is how it will look and blur effect can be intensified by the slider shown in step-3. I have changed blur a bit and happy with what it's showing right now.7. When done with this selective blur effect in Adobe Photoshop Elements, click  Done and come out of this workflow. We clicked on the drop-down below the image an select Before-After horizontal View.This is how it would shown the original Photograph and the final result. Hope you are happy with results. At times, this doesn't give good results with subject having non-uniformed shapes, which is the usual thing. We shall discuss the other trick to handle such subjects with Custom Depth of Field Effect soon.This is original Photograph used in this articlFinal Result we got through Simple Depth of Field Guided Edit in Adobe Photoshop Elements.  Next article would cover Custom Depth of Field Technique to deal with all types of shapes of main subject.

2. There are various sections under Guided Edit Panel in Adobe Photoshop Elements. Select 'Lens Effect' and Click on 'Depth of Field' . The image shown below shows the refreshed panel after click Depth of Field Guided Edit.

There is a Guided Edit in Adobe Photoshop Elements, which is called as 'Depth of Field'. By looking at above results you might have noticed that it is nowhere near to Depth of Field effect we get with Cameras. So as of now, let's call it partial bur technique which helps in achieving results near to Shallow Depth of Field. Guided Edits in Adobe Photoshop Elements are most easy to use effects with step-by-step guidelines. Let's see how Depth of Field Guided Edit work and perform... Let's go step by step and also learn things we need to be aware of during different steps1. Open a photograph in Adobe Photoshop Elements Editor and go to Guided Edit Panel. (Please see the image below and make sure that this is how your workspace look like...)2. There are various sections under Guided Edit Panel in Adobe Photoshop Elements. Select 'Lens Effect' and Click on 'Depth of Field' . The image shown below shows the refreshed panel after click Depth of Field Guided Edit3. Now in Depth of Field Guided Edit, there are two different options to go for. In this article we will explore the first one and simple one :) . Names of these two effects are - SIMPLE and CUSTOM (Can you guess what these would be?) . To me first one sounds something easy and basic, while the second one should be something exciting :). Let's see if I am write or wrong. So click on Simple, the first option and proceed. It should open following screen on right side of Adobe Photoshop Elements - Editor.4. Click on 'Add Blur', although it will give scary effect of blur on first go, but don't worry. It will gradually move towards what you expect out of it. So first step will add blur to your photograph, like what you see in following image.5. This is most critical step, where we have to be very careful to get near to best results. There is a gradient marker and we have to mark an area which should be in focus. First time, it's difficult to guess the effect it would give but try and refine gradually. As a small tip, mark the area towards the middle of the main subject and it will automatically take care of surrounding regions. At times, this require re-measurements again n again. So try it and reach the best possible you can get out of it6. This is how it will look and blur effect can be intensified by the slider shown in step-3. I have changed blur a bit and happy with what it's showing right now.7. When done with this selective blur effect in Adobe Photoshop Elements, click  Done and come out of this workflow. We clicked on the drop-down below the image an select Before-After horizontal View.This is how it would shown the original Photograph and the final result. Hope you are happy with results. At times, this doesn't give good results with subject having non-uniformed shapes, which is the usual thing. We shall discuss the other trick to handle such subjects with Custom Depth of Field Effect soon.This is original Photograph used in this articlFinal Result we got through Simple Depth of Field Guided Edit in Adobe Photoshop Elements.  Next article would cover Custom Depth of Field Technique to deal with all types of shapes of main subject.
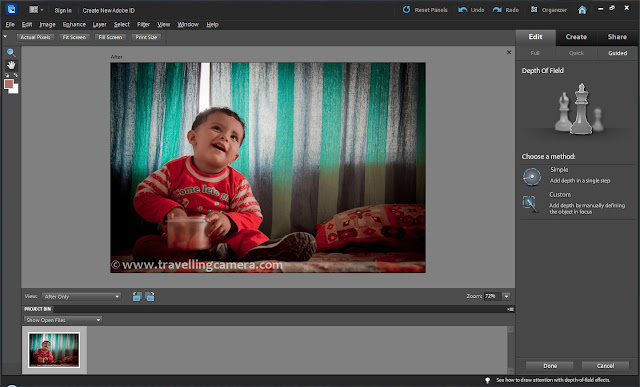
3. Now in Depth of Field Guided Edit, there are two different options to go for. In this article we will explore the first one and simple one :) . Names of these two effects are - SIMPLE and CUSTOM (Can you guess what these would be?) . To me first one sounds something easy and basic, while the second one should be something exciting :). Let's see if I am write or wrong. So click on Simple, the first option and proceed. It should open following screen on right side of Adobe Photoshop Elements - Editor.

There is a Guided Edit in Adobe Photoshop Elements, which is called as 'Depth of Field'. By looking at above results you might have noticed that it is nowhere near to Depth of Field effect we get with Cameras. So as of now, let's call it partial bur technique which helps in achieving results near to Shallow Depth of Field. Guided Edits in Adobe Photoshop Elements are most easy to use effects with step-by-step guidelines. Let's see how Depth of Field Guided Edit work and perform... Let's go step by step and also learn things we need to be aware of during different steps1. Open a photograph in Adobe Photoshop Elements Editor and go to Guided Edit Panel. (Please see the image below and make sure that this is how your workspace look like...)2. There are various sections under Guided Edit Panel in Adobe Photoshop Elements. Select 'Lens Effect' and Click on 'Depth of Field' . The image shown below shows the refreshed panel after click Depth of Field Guided Edit3. Now in Depth of Field Guided Edit, there are two different options to go for. In this article we will explore the first one and simple one :) . Names of these two effects are - SIMPLE and CUSTOM (Can you guess what these would be?) . To me first one sounds something easy and basic, while the second one should be something exciting :). Let's see if I am write or wrong. So click on Simple, the first option and proceed. It should open following screen on right side of Adobe Photoshop Elements - Editor.4. Click on 'Add Blur', although it will give scary effect of blur on first go, but don't worry. It will gradually move towards what you expect out of it. So first step will add blur to your photograph, like what you see in following image.5. This is most critical step, where we have to be very careful to get near to best results. There is a gradient marker and we have to mark an area which should be in focus. First time, it's difficult to guess the effect it would give but try and refine gradually. As a small tip, mark the area towards the middle of the main subject and it will automatically take care of surrounding regions. At times, this require re-measurements again n again. So try it and reach the best possible you can get out of it6. This is how it will look and blur effect can be intensified by the slider shown in step-3. I have changed blur a bit and happy with what it's showing right now.7. When done with this selective blur effect in Adobe Photoshop Elements, click  Done and come out of this workflow. We clicked on the drop-down below the image an select Before-After horizontal View.This is how it would shown the original Photograph and the final result. Hope you are happy with results. At times, this doesn't give good results with subject having non-uniformed shapes, which is the usual thing. We shall discuss the other trick to handle such subjects with Custom Depth of Field Effect soon.This is original Photograph used in this articlFinal Result we got through Simple Depth of Field Guided Edit in Adobe Photoshop Elements.  Next article would cover Custom Depth of Field Technique to deal with all types of shapes of main subject.
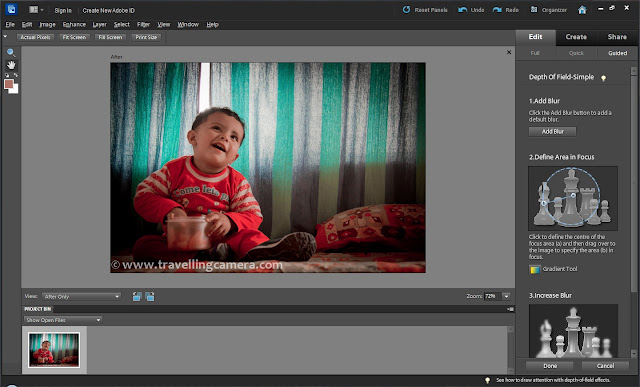
4. Click on 'Add Blur', although it will give scary effect of blur on first go, but don't worry. It will gradually move towards what you expect out of it. So first step will add blur to your photograph, like what you see in following image.

There is a Guided Edit in Adobe Photoshop Elements, which is called as 'Depth of Field'. By looking at above results you might have noticed that it is nowhere near to Depth of Field effect we get with Cameras. So as of now, let's call it partial bur technique which helps in achieving results near to Shallow Depth of Field. Guided Edits in Adobe Photoshop Elements are most easy to use effects with step-by-step guidelines. Let's see how Depth of Field Guided Edit work and perform... Let's go step by step and also learn things we need to be aware of during different steps1. Open a photograph in Adobe Photoshop Elements Editor and go to Guided Edit Panel. (Please see the image below and make sure that this is how your workspace look like...)2. There are various sections under Guided Edit Panel in Adobe Photoshop Elements. Select 'Lens Effect' and Click on 'Depth of Field' . The image shown below shows the refreshed panel after click Depth of Field Guided Edit3. Now in Depth of Field Guided Edit, there are two different options to go for. In this article we will explore the first one and simple one :) . Names of these two effects are - SIMPLE and CUSTOM (Can you guess what these would be?) . To me first one sounds something easy and basic, while the second one should be something exciting :). Let's see if I am write or wrong. So click on Simple, the first option and proceed. It should open following screen on right side of Adobe Photoshop Elements - Editor.4. Click on 'Add Blur', although it will give scary effect of blur on first go, but don't worry. It will gradually move towards what you expect out of it. So first step will add blur to your photograph, like what you see in following image.5. This is most critical step, where we have to be very careful to get near to best results. There is a gradient marker and we have to mark an area which should be in focus. First time, it's difficult to guess the effect it would give but try and refine gradually. As a small tip, mark the area towards the middle of the main subject and it will automatically take care of surrounding regions. At times, this require re-measurements again n again. So try it and reach the best possible you can get out of it6. This is how it will look and blur effect can be intensified by the slider shown in step-3. I have changed blur a bit and happy with what it's showing right now.7. When done with this selective blur effect in Adobe Photoshop Elements, click  Done and come out of this workflow. We clicked on the drop-down below the image an select Before-After horizontal View.This is how it would shown the original Photograph and the final result. Hope you are happy with results. At times, this doesn't give good results with subject having non-uniformed shapes, which is the usual thing. We shall discuss the other trick to handle such subjects with Custom Depth of Field Effect soon.This is original Photograph used in this articlFinal Result we got through Simple Depth of Field Guided Edit in Adobe Photoshop Elements.  Next article would cover Custom Depth of Field Technique to deal with all types of shapes of main subject.

5. This is most critical step, where we have to be very careful to get near to best results. There is a gradient marker and we have to mark an area which should be in focus. First time, it's difficult to guess the effect it would give but try and refine gradually. As a small tip, mark the area towards the middle of the main subject and it will automatically take care of surrounding regions. At times, this require re-measurements again n again. So try it and reach the best possible you can get out of it.

There is a Guided Edit in Adobe Photoshop Elements, which is called as 'Depth of Field'. By looking at above results you might have noticed that it is nowhere near to Depth of Field effect we get with Cameras. So as of now, let's call it partial bur technique which helps in achieving results near to Shallow Depth of Field. Guided Edits in Adobe Photoshop Elements are most easy to use effects with step-by-step guidelines. Let's see how Depth of Field Guided Edit work and perform... Let's go step by step and also learn things we need to be aware of during different steps1. Open a photograph in Adobe Photoshop Elements Editor and go to Guided Edit Panel. (Please see the image below and make sure that this is how your workspace look like...)2. There are various sections under Guided Edit Panel in Adobe Photoshop Elements. Select 'Lens Effect' and Click on 'Depth of Field' . The image shown below shows the refreshed panel after click Depth of Field Guided Edit3. Now in Depth of Field Guided Edit, there are two different options to go for. In this article we will explore the first one and simple one :) . Names of these two effects are - SIMPLE and CUSTOM (Can you guess what these would be?) . To me first one sounds something easy and basic, while the second one should be something exciting :). Let's see if I am write or wrong. So click on Simple, the first option and proceed. It should open following screen on right side of Adobe Photoshop Elements - Editor.4. Click on 'Add Blur', although it will give scary effect of blur on first go, but don't worry. It will gradually move towards what you expect out of it. So first step will add blur to your photograph, like what you see in following image.5. This is most critical step, where we have to be very careful to get near to best results. There is a gradient marker and we have to mark an area which should be in focus. First time, it's difficult to guess the effect it would give but try and refine gradually. As a small tip, mark the area towards the middle of the main subject and it will automatically take care of surrounding regions. At times, this require re-measurements again n again. So try it and reach the best possible you can get out of it6. This is how it will look and blur effect can be intensified by the slider shown in step-3. I have changed blur a bit and happy with what it's showing right now.7. When done with this selective blur effect in Adobe Photoshop Elements, click  Done and come out of this workflow. We clicked on the drop-down below the image an select Before-After horizontal View.This is how it would shown the original Photograph and the final result. Hope you are happy with results. At times, this doesn't give good results with subject having non-uniformed shapes, which is the usual thing. We shall discuss the other trick to handle such subjects with Custom Depth of Field Effect soon.This is original Photograph used in this articlFinal Result we got through Simple Depth of Field Guided Edit in Adobe Photoshop Elements.  Next article would cover Custom Depth of Field Technique to deal with all types of shapes of main subject.
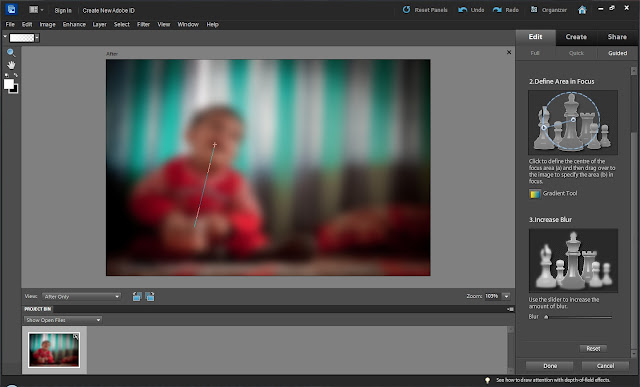
6. This is how it will look and blur effect can be intensified by the slider shown in step-3. I have changed blur a bit and happy with what it's showing right now.

There is a Guided Edit in Adobe Photoshop Elements, which is called as 'Depth of Field'. By looking at above results you might have noticed that it is nowhere near to Depth of Field effect we get with Cameras. So as of now, let's call it partial bur technique which helps in achieving results near to Shallow Depth of Field. Guided Edits in Adobe Photoshop Elements are most easy to use effects with step-by-step guidelines. Let's see how Depth of Field Guided Edit work and perform... Let's go step by step and also learn things we need to be aware of during different steps1. Open a photograph in Adobe Photoshop Elements Editor and go to Guided Edit Panel. (Please see the image below and make sure that this is how your workspace look like...)2. There are various sections under Guided Edit Panel in Adobe Photoshop Elements. Select 'Lens Effect' and Click on 'Depth of Field' . The image shown below shows the refreshed panel after click Depth of Field Guided Edit3. Now in Depth of Field Guided Edit, there are two different options to go for. In this article we will explore the first one and simple one :) . Names of these two effects are - SIMPLE and CUSTOM (Can you guess what these would be?) . To me first one sounds something easy and basic, while the second one should be something exciting :). Let's see if I am write or wrong. So click on Simple, the first option and proceed. It should open following screen on right side of Adobe Photoshop Elements - Editor.4. Click on 'Add Blur', although it will give scary effect of blur on first go, but don't worry. It will gradually move towards what you expect out of it. So first step will add blur to your photograph, like what you see in following image.5. This is most critical step, where we have to be very careful to get near to best results. There is a gradient marker and we have to mark an area which should be in focus. First time, it's difficult to guess the effect it would give but try and refine gradually. As a small tip, mark the area towards the middle of the main subject and it will automatically take care of surrounding regions. At times, this require re-measurements again n again. So try it and reach the best possible you can get out of it6. This is how it will look and blur effect can be intensified by the slider shown in step-3. I have changed blur a bit and happy with what it's showing right now.7. When done with this selective blur effect in Adobe Photoshop Elements, click  Done and come out of this workflow. We clicked on the drop-down below the image an select Before-After horizontal View.This is how it would shown the original Photograph and the final result. Hope you are happy with results. At times, this doesn't give good results with subject having non-uniformed shapes, which is the usual thing. We shall discuss the other trick to handle such subjects with Custom Depth of Field Effect soon.This is original Photograph used in this articlFinal Result we got through Simple Depth of Field Guided Edit in Adobe Photoshop Elements.  Next article would cover Custom Depth of Field Technique to deal with all types of shapes of main subject.
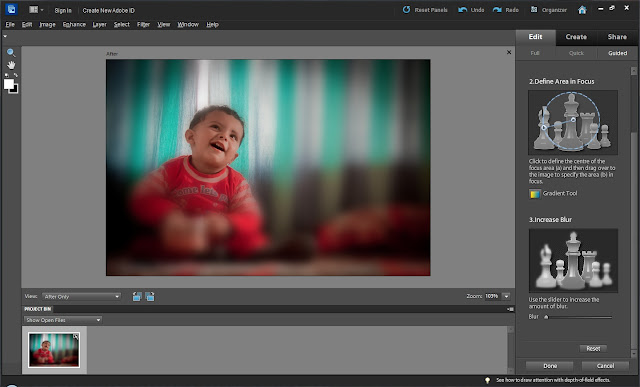
7. When done with this selective blur effect in Adobe Photoshop Elements, click  Done and come out of this workflow. We clicked on the drop-down below the image an select Before-After horizontal View.

There is a Guided Edit in Adobe Photoshop Elements, which is called as 'Depth of Field'. By looking at above results you might have noticed that it is nowhere near to Depth of Field effect we get with Cameras. So as of now, let's call it partial bur technique which helps in achieving results near to Shallow Depth of Field. Guided Edits in Adobe Photoshop Elements are most easy to use effects with step-by-step guidelines. Let's see how Depth of Field Guided Edit work and perform... Let's go step by step and also learn things we need to be aware of during different steps1. Open a photograph in Adobe Photoshop Elements Editor and go to Guided Edit Panel. (Please see the image below and make sure that this is how your workspace look like...)2. There are various sections under Guided Edit Panel in Adobe Photoshop Elements. Select 'Lens Effect' and Click on 'Depth of Field' . The image shown below shows the refreshed panel after click Depth of Field Guided Edit3. Now in Depth of Field Guided Edit, there are two different options to go for. In this article we will explore the first one and simple one :) . Names of these two effects are - SIMPLE and CUSTOM (Can you guess what these would be?) . To me first one sounds something easy and basic, while the second one should be something exciting :). Let's see if I am write or wrong. So click on Simple, the first option and proceed. It should open following screen on right side of Adobe Photoshop Elements - Editor.4. Click on 'Add Blur', although it will give scary effect of blur on first go, but don't worry. It will gradually move towards what you expect out of it. So first step will add blur to your photograph, like what you see in following image.5. This is most critical step, where we have to be very careful to get near to best results. There is a gradient marker and we have to mark an area which should be in focus. First time, it's difficult to guess the effect it would give but try and refine gradually. As a small tip, mark the area towards the middle of the main subject and it will automatically take care of surrounding regions. At times, this require re-measurements again n again. So try it and reach the best possible you can get out of it6. This is how it will look and blur effect can be intensified by the slider shown in step-3. I have changed blur a bit and happy with what it's showing right now.7. When done with this selective blur effect in Adobe Photoshop Elements, click  Done and come out of this workflow. We clicked on the drop-down below the image an select Before-After horizontal View.This is how it would shown the original Photograph and the final result. Hope you are happy with results. At times, this doesn't give good results with subject having non-uniformed shapes, which is the usual thing. We shall discuss the other trick to handle such subjects with Custom Depth of Field Effect soon.This is original Photograph used in this articlFinal Result we got through Simple Depth of Field Guided Edit in Adobe Photoshop Elements.  Next article would cover Custom Depth of Field Technique to deal with all types of shapes of main subject.

This is how it would shown the original Photograph and the final result. Hope you are happy with results. At times, this doesn't give good results with subject having non-uniformed shapes, which is the usual thing. We shall discuss the other trick to handle such subjects with Custom Depth of Field Effect soon.

There is a Guided Edit in Adobe Photoshop Elements, which is called as 'Depth of Field'. By looking at above results you might have noticed that it is nowhere near to Depth of Field effect we get with Cameras. So as of now, let's call it partial bur technique which helps in achieving results near to Shallow Depth of Field. Guided Edits in Adobe Photoshop Elements are most easy to use effects with step-by-step guidelines. Let's see how Depth of Field Guided Edit work and perform... Let's go step by step and also learn things we need to be aware of during different steps1. Open a photograph in Adobe Photoshop Elements Editor and go to Guided Edit Panel. (Please see the image below and make sure that this is how your workspace look like...)2. There are various sections under Guided Edit Panel in Adobe Photoshop Elements. Select 'Lens Effect' and Click on 'Depth of Field' . The image shown below shows the refreshed panel after click Depth of Field Guided Edit3. Now in Depth of Field Guided Edit, there are two different options to go for. In this article we will explore the first one and simple one :) . Names of these two effects are - SIMPLE and CUSTOM (Can you guess what these would be?) . To me first one sounds something easy and basic, while the second one should be something exciting :). Let's see if I am write or wrong. So click on Simple, the first option and proceed. It should open following screen on right side of Adobe Photoshop Elements - Editor.4. Click on 'Add Blur', although it will give scary effect of blur on first go, but don't worry. It will gradually move towards what you expect out of it. So first step will add blur to your photograph, like what you see in following image.5. This is most critical step, where we have to be very careful to get near to best results. There is a gradient marker and we have to mark an area which should be in focus. First time, it's difficult to guess the effect it would give but try and refine gradually. As a small tip, mark the area towards the middle of the main subject and it will automatically take care of surrounding regions. At times, this require re-measurements again n again. So try it and reach the best possible you can get out of it6. This is how it will look and blur effect can be intensified by the slider shown in step-3. I have changed blur a bit and happy with what it's showing right now.7. When done with this selective blur effect in Adobe Photoshop Elements, click  Done and come out of this workflow. We clicked on the drop-down below the image an select Before-After horizontal View.This is how it would shown the original Photograph and the final result. Hope you are happy with results. At times, this doesn't give good results with subject having non-uniformed shapes, which is the usual thing. We shall discuss the other trick to handle such subjects with Custom Depth of Field Effect soon.This is original Photograph used in this articlFinal Result we got through Simple Depth of Field Guided Edit in Adobe Photoshop Elements.  Next article would cover Custom Depth of Field Technique to deal with all types of shapes of main subject.

There is a Guided Edit in Adobe Photoshop Elements, which is called as 'Depth of Field'. By looking at above results you might have noticed that it is nowhere near to Depth of Field effect we get with Cameras. So as of now, let's call it partial bur technique which helps in achieving results near to Shallow Depth of Field. Guided Edits in Adobe Photoshop Elements are most easy to use effects with step-by-step guidelines. Let's see how Depth of Field Guided Edit work and perform... Let's go step by step and also learn things we need to be aware of during different steps1. Open a photograph in Adobe Photoshop Elements Editor and go to Guided Edit Panel. (Please see the image below and make sure that this is how your workspace look like...)2. There are various sections under Guided Edit Panel in Adobe Photoshop Elements. Select 'Lens Effect' and Click on 'Depth of Field' . The image shown below shows the refreshed panel after click Depth of Field Guided Edit3. Now in Depth of Field Guided Edit, there are two different options to go for. In this article we will explore the first one and simple one :) . Names of these two effects are - SIMPLE and CUSTOM (Can you guess what these would be?) . To me first one sounds something easy and basic, while the second one should be something exciting :). Let's see if I am write or wrong. So click on Simple, the first option and proceed. It should open following screen on right side of Adobe Photoshop Elements - Editor.4. Click on 'Add Blur', although it will give scary effect of blur on first go, but don't worry. It will gradually move towards what you expect out of it. So first step will add blur to your photograph, like what you see in following image.5. This is most critical step, where we have to be very careful to get near to best results. There is a gradient marker and we have to mark an area which should be in focus. First time, it's difficult to guess the effect it would give but try and refine gradually. As a small tip, mark the area towards the middle of the main subject and it will automatically take care of surrounding regions. At times, this require re-measurements again n again. So try it and reach the best possible you can get out of it6. This is how it will look and blur effect can be intensified by the slider shown in step-3. I have changed blur a bit and happy with what it's showing right now.7. When done with this selective blur effect in Adobe Photoshop Elements, click  Done and come out of this workflow. We clicked on the drop-down below the image an select Before-After horizontal View.This is how it would shown the original Photograph and the final result. Hope you are happy with results. At times, this doesn't give good results with subject having non-uniformed shapes, which is the usual thing. We shall discuss the other trick to handle such subjects with Custom Depth of Field Effect soon.This is original Photograph used in this articlFinal Result we got through Simple Depth of Field Guided Edit in Adobe Photoshop Elements.  Next article would cover Custom Depth of Field Technique to deal with all types of shapes of main subject.

This is original Photograph used in this article.

There is a Guided Edit in Adobe Photoshop Elements, which is called as 'Depth of Field'. By looking at above results you might have noticed that it is nowhere near to Depth of Field effect we get with Cameras. So as of now, let's call it partial bur technique which helps in achieving results near to Shallow Depth of Field. Guided Edits in Adobe Photoshop Elements are most easy to use effects with step-by-step guidelines. Let's see how Depth of Field Guided Edit work and perform... Let's go step by step and also learn things we need to be aware of during different steps1. Open a photograph in Adobe Photoshop Elements Editor and go to Guided Edit Panel. (Please see the image below and make sure that this is how your workspace look like...)2. There are various sections under Guided Edit Panel in Adobe Photoshop Elements. Select 'Lens Effect' and Click on 'Depth of Field' . The image shown below shows the refreshed panel after click Depth of Field Guided Edit3. Now in Depth of Field Guided Edit, there are two different options to go for. In this article we will explore the first one and simple one :) . Names of these two effects are - SIMPLE and CUSTOM (Can you guess what these would be?) . To me first one sounds something easy and basic, while the second one should be something exciting :). Let's see if I am write or wrong. So click on Simple, the first option and proceed. It should open following screen on right side of Adobe Photoshop Elements - Editor.4. Click on 'Add Blur', although it will give scary effect of blur on first go, but don't worry. It will gradually move towards what you expect out of it. So first step will add blur to your photograph, like what you see in following image.5. This is most critical step, where we have to be very careful to get near to best results. There is a gradient marker and we have to mark an area which should be in focus. First time, it's difficult to guess the effect it would give but try and refine gradually. As a small tip, mark the area towards the middle of the main subject and it will automatically take care of surrounding regions. At times, this require re-measurements again n again. So try it and reach the best possible you can get out of it6. This is how it will look and blur effect can be intensified by the slider shown in step-3. I have changed blur a bit and happy with what it's showing right now.7. When done with this selective blur effect in Adobe Photoshop Elements, click  Done and come out of this workflow. We clicked on the drop-down below the image an select Before-After horizontal View.This is how it would shown the original Photograph and the final result. Hope you are happy with results. At times, this doesn't give good results with subject having non-uniformed shapes, which is the usual thing. We shall discuss the other trick to handle such subjects with Custom Depth of Field Effect soon.This is original Photograph used in this articlFinal Result we got through Simple Depth of Field Guided Edit in Adobe Photoshop Elements.  Next article would cover Custom Depth of Field Technique to deal with all types of shapes of main subject.

Final Result we got through Simple Depth of Field Guided Edit in Adobe Photoshop Elements.  Next article would cover Custom Depth of Field Technique to deal with all types of shapes of main subject.

Trending Post Today !

How to reach Kasol/Malana and top things to do around this stunning hill-station of Himalayan State of India

Main places to see & Top things to do around Dalhousie : Stunning Hill Station in Himalayan State of India