Long time back we had shared a way of processing mutiple files where resizing, renaming, adding watermarks etc can be done to a set files in one go. Few days back, I got a quesry about convenient way of processing multiple raw files and here is the method.
So first thing is to open all the files in Adobe Camera Raw dialog. Now, select all the files in left panel of Adobe Camera Raw dialog in Adobe Photoshop Elements and click "Open Images" button. It will open all the raw files in Editor.
Now its time to process all these raw files and here is the method :
*** KEY IS TO SELECT "Open Files" in first dropdown for 'process files from'...
Batch Processing in Adobe Photoshop Elements (Editor) : Resizing, Auto-Adjustments, Watermarking, Renaming, Labeling and Changing File-Types
As discussed in last post on this blog, here is one of the method to prepare a set of files you want to prepare for uploading to your Website or Blog...
Adobe Photoshop Elements - Editor helps in processing multiple files for following operations. All these operations can be applied to a set of Files which are in some specific folder or opened in Editor...
1. File Renaming
2. File Resizing
3. Adding Watermarks or Labeling
4. Changing File Types
5. Applying Auto-Adjustments
a. Auto Levels
b. Auto Contrast
a. Auto Color
b. Sharpen
Now lets talk about the workflow to achieve this.
Option to Launch Batch Processing Dialog : PSE-Editor >> File Menu >> Process Multiple Files
At First we will discuss what can be source for Batch Processing. All Files currently open in Adobe Photoshop Elements Editor...
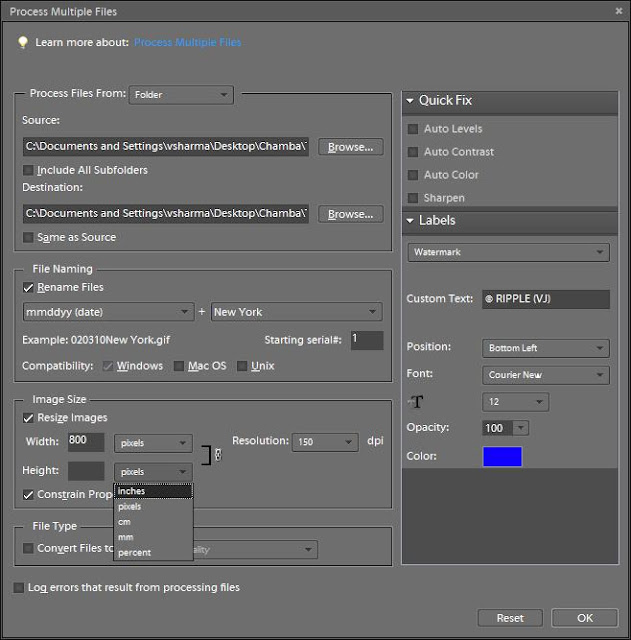
I will consider first scenario here where you have all the files to be processed in on Folder. So in first section of this dialog you need to select the folder where all files are placed. Check the option for including Subfolders in case its applicable for you....
Now you need to provide the location where you want to get the final files...In case you want the output files at same location simply check the option "Same as Source" and need not to provide a separate location for output files...
What's Next after selecting Source and Destinations for Files
Now its time to opt for settings you want to apply on all the files you have.... Lets consider second section of this dialog which gives various options for renaming your files. As you must be knowing that correct file name with meaningful information are very well entertained by image search engines... In Adobe Photoshop Elements, there are various renaming options: Please see Image below which showsthere options in a Dropdown...You can then choose the naming convention such as typing a document name and the sequential numbering system to be used...
Next is File Resizing :
In the image size area select Resize Images as that is what we came here to do. Select Constrain Proportions as you will want your images to be resized in proportion and not skewed or distorted out of shape. Width and Height values can be mentioned in Pixels, Cm, mm, inches, percent... there is also an option to mention dpi values... For my Blogs, I use 640*480
Now type the largest Width or Height to use for your resized images. If you enter 800 for the Width you will be unable to enter a value for the Height and vice versa. This is because you can only set one value : width OR height .So if you enter 800 as the Width all images will be sized so their width is 800 and their respective heights will be adjusted in proportion. Portrait images will be taller than 800 pixels and Landscape ones will be shorter.
Here too you should set the resolution for the images. For the web select 72 dpi.
File Type Conversion...
To convert the files to a different format or to compress them, select the file format to use. For JPEG format images you can choose Max, High, Medium or Low quality.
Auto Adjustments through Btach Processing in Adobe Photoshop Elements
You can also apply a Quick Fix to your images as you process them. These fixes include Auto Contrast, AutoLevels, Auto Color and Sharpen.
Labeling and Watermarking
You can also apply Labels to your image such as adding a watermark or caption by configuring the options in the Labels area....This is a key feature in this dialog which is required by many photographers... In my case, I come to this dialog only because Watermarking is very easy through this... Most of the controls in this dialog are self explainator... Please let me know through comments in case you need more details on something related to this dialog...
When you are done with all the selection, Click OK and you will get your resized files in Destination folder selected.... HAPPY BLOGGING :)


.jpg)
Comments