Preparing photographs for your Blog/Website by using Batch Processing in Adobe Photoshop Elements for resizing, renaming and exporting into new file-type

We can also do batch processing in organizer for exporting low resolution files for my blog or website. I prefer this method when I don't need watermarks, because this mechanism does not support adding Watermarks.

Lets come to the point and discuss how to do this. I will proceed with the workflow I prefer.

1. SELECT YOUR FILES AND OPEN EXPORT DIALOG

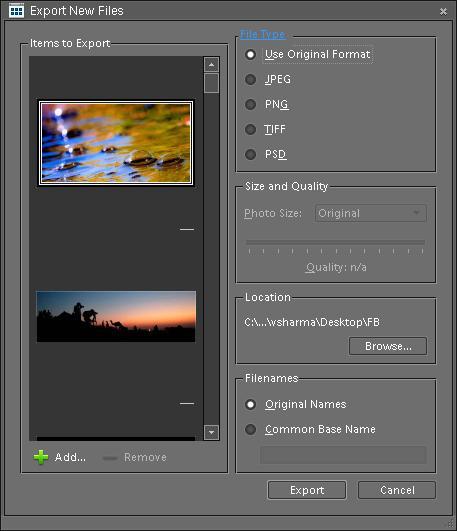
Normally I organize my similar or relevant photographs through Albums in PSE Organizer. I select my Album and it shows all the files in Organizer Image-well. Press CTRL+A to select all the files in album which I want to export. After Selection, Go to File > Export to New File(s). It will the dialog shown below:

Posted by Ripple (VJ) : Preparing photographs for your Blog/Wesite by using Batch Processing in Adobe Photoshop Elements for resizing, renaming and exporting into new file-type: As discussed in last post we can also do batch processing in organizer for exporting low resolution files for my blog or website. I prefer this method when I don't need watermarks, because this mechanism does not support adding Watermarks.Lets come to the point and discuss how to do this. I will proceed with the workflow I prefer.1. SELECT YOUR FILES AND OPEN EXPORT DIALOGNormally I organize my similar or relevant photographs through Albums in PSE Organizer. I select my Album and it shows all the files in Organizer Image-well. Press CTRL+A to select all the files in album which I want to export. After Selection, Go to File > Export to New File(s). It will the dialog shown below:
In above dialog you can see that all selected Photographs are shown in left panel and there is flexibility to add more or remove some photographs from this selection. Use "+" and "-" signs to do so...

2. SELECT FILE-TYPE YOU WANT

In  first section of this dialog, select the file format you want to export. There are five options : 
1. Use Original Format
2. JPEG
3. PNG
4. TIFF
5. PSD

In my case, I use JEPG normally... Its your choice what you need...

3. SELECT RESOLUTION AND QUALITY

Next step is to select appropriate resolution. I prefer 640*480 for my blog and its your choice but its preferred to use file-size less than 1024*768....

Quality is only applicable for JPEG files and we will talk more on Quality parameter on this blog...

Posted by Ripple (VJ) : Preparing photographs for your Blog/Wesite by using Batch Processing in Adobe Photoshop Elements for resizing, renaming and exporting into new file-type: As discussed in last post we can also do batch processing in organizer for exporting low resolution files for my blog or website. I prefer this method when I don't need watermarks, because this mechanism does not support adding Watermarks.Lets come to the point and discuss how to do this. I will proceed with the workflow I prefer.1. SELECT YOUR FILES AND OPEN EXPORT DIALOGNormally I organize my similar or relevant photographs through Albums in PSE Organizer. I select my Album and it shows all the files in Organizer Image-well. Press CTRL+A to select all the files in album which I want to export. After Selection, Go to File > Export to New File(s). It will the dialog shown below:In above dialog you can see that all selected Photographs are shown in left panel and there is flexibility to add more or remove some photographs from this selection. 2. SELECT FILE-TYPE YOU WANT In  first section of this dialog, select the file format you want to export. There are five options : 1. Use Original Format 2. JPEG 3. PNG 4. TIFF 5. PSD In my case, I use JEPG normally... Its your choice what you need... 3. SELECT RESOLUTION AND QUALITY Next step is to select appropriate resolution. I prefer 640*480 for my blog and its your choice but its preferred to use file-size less than 1024*768.... Quality is only applicable for JPEG files and we will talk more on Quality parameter on this blog...4. SELECT THE LOCATION WHERE YOU WANT TO EXPORT5 GIVE APPROPRIATE NAME TO YOUR FILES


Last step is to give appropriate names to your files and click on Export to get renamed, resized files in desired format...Next step is to select the location where you want to export the selected files. It gives you option to launch Windows Explorer to locate the folder or create a folder.

4. SELECT THE LOCATION WHERE YOU WANT TO EXPORT

Next step is to select the location where you want to export the selected files. It gives you option to launch Windows Explorer to locate the folder or create a folder.
Posted by Ripple (VJ) : Preparing photographs for your Blog/Wesite by using Batch Processing in Adobe Photoshop Elements for resizing, renaming and exporting into new file-type: As discussed in last post we can also do batch processing in organizer for exporting low resolution files for my blog or website. I prefer this method when I don't need watermarks, because this mechanism does not support adding Watermarks.Lets come to the point and discuss how to do this. I will proceed with the workflow I prefer.1. SELECT YOUR FILES AND OPEN EXPORT DIALOGNormally I organize my similar or relevant photographs through Albums in PSE Organizer. I select my Album and it shows all the files in Organizer Image-well. Press CTRL+A to select all the files in album which I want to export. After Selection, Go to File > Export to New File(s). It will the dialog shown below:5 GIVE APPROPRIATE NAME TO YOUR FILES.. Last step is to give appropriate names to your files and click on Export to get renamed, resized files in desired format...

5 GIVE APPROPRIATE NAME TO YOUR FILES


Last step is to give appropriate names to your files and click on Export to get renamed, resized files in desired format...

Trending Post Today !

How to reach Kasol/Malana and top things to do around this stunning hill-station of Himalayan State of India

Main places to see & Top things to do around Dalhousie : Stunning Hill Station in Himalayan State of India