Can we add rounded Frames to a photograph in Adobe Photoshop Elements?

Of Course Adobe Photoshop Elements is capable of doing such things but if you have full Photoshop version as well, then life is quite easy. Let me share first the way to add rounded Frames in Adobe Photoshop and then explore the possibilities inside Adobe Photoshop Elements. Let go step by step -1. Launch Photoshop, I have CS5 installed and all screenshots shared here are from Adobe Photoshop CS5. There is one trick that we shall not open the file in Photoshop Workspace. We shall open the photograph in Adobe Camera Raw Dialog. So go to File Menu and say Open as - 2. On selecting Open as option, below shown dialog will be shown. In this dialog select Camera Raw option in Second dropdown - 'Open As'3. Appropriate file will be opened in Adobe Camera Raw Dialog.Just for your reference, let's also look at Adobe Camera Raw dialog in Adobe Photoshop Elements. Note the processing controls shown on right side. Elements has limited access to Adobe Camera Raw Functionality.4. Go to Effects Tab in Adobe Camera Raw Dialog.5. Here we have two sections and we have to go to second section - 'Post Crop Vignetting'. Move all Sliders to left-most point. (Amount, MidPoint, Roundness, Feather etc )6. Here you have a rounded Frame now. Just open this file in Photoshop and save as a new JPEG. You are done.In case want to have wider border, just increase Canvas Size as discussed @ http://photoshopelementsbyadobe.blogspot.com/2011/12/how-to-add-simple-frame-to-photograph.html

Of Course Adobe Photoshop Elements is capable of doing such things but if you have full Photoshop version as well, then life is quite easy. Let me share first the way to add rounded Frames in Adobe Photoshop and then explore the possibilities inside Adobe Photoshop Elements. 

Let go step by step -

1. Launch Photoshop, I have CS5 installed and all screenshots shared here are from Adobe Photoshop CS5. There is one trick that we shall not open the file in Photoshop Workspace. We shall open the photograph in Adobe Camera Raw Dialog. So go to File Menu and say Open as - 

Of Course Adobe Photoshop Elements is capable of doing such things but if you have full Photoshop version as well, then life is quite easy. Let me share first the way to add rounded Frames in Adobe Photoshop and then explore the possibilities inside Adobe Photoshop Elements. Let go step by step -1. Launch Photoshop, I have CS5 installed and all screenshots shared here are from Adobe Photoshop CS5. There is one trick that we shall not open the file in Photoshop Workspace. We shall open the photograph in Adobe Camera Raw Dialog. So go to File Menu and say Open as - 2. On selecting Open as option, below shown dialog will be shown. In this dialog select Camera Raw option in Second dropdown - 'Open As'3. Appropriate file will be opened in Adobe Camera Raw Dialog.Just for your reference, let's also look at Adobe Camera Raw dialog in Adobe Photoshop Elements. Note the processing controls shown on right side. Elements has limited access to Adobe Camera Raw Functionality.4. Go to Effects Tab in Adobe Camera Raw Dialog.5. Here we have two sections and we have to go to second section - 'Post Crop Vignetting'. Move all Sliders to left-most point. (Amount, MidPoint, Roundness, Feather etc )6. Here you have a rounded Frame now. Just open this file in Photoshop and save as a new JPEG. You are done.In case want to have wider border, just increase Canvas Size as discussed @ http://photoshopelementsbyadobe.blogspot.com/2011/12/how-to-add-simple-frame-to-photograph.html

2. On selecting Open as option, below shown dialog will be shown. In this dialog select Camera Raw option in Second dropdown - 'Open As'

Of Course Adobe Photoshop Elements is capable of doing such things but if you have full Photoshop version as well, then life is quite easy. Let me share first the way to add rounded Frames in Adobe Photoshop and then explore the possibilities inside Adobe Photoshop Elements. Let go step by step -1. Launch Photoshop, I have CS5 installed and all screenshots shared here are from Adobe Photoshop CS5. There is one trick that we shall not open the file in Photoshop Workspace. We shall open the photograph in Adobe Camera Raw Dialog. So go to File Menu and say Open as - 2. On selecting Open as option, below shown dialog will be shown. In this dialog select Camera Raw option in Second dropdown - 'Open As'3. Appropriate file will be opened in Adobe Camera Raw Dialog.Just for your reference, let's also look at Adobe Camera Raw dialog in Adobe Photoshop Elements. Note the processing controls shown on right side. Elements has limited access to Adobe Camera Raw Functionality.4. Go to Effects Tab in Adobe Camera Raw Dialog.5. Here we have two sections and we have to go to second section - 'Post Crop Vignetting'. Move all Sliders to left-most point. (Amount, MidPoint, Roundness, Feather etc )6. Here you have a rounded Frame now. Just open this file in Photoshop and save as a new JPEG. You are done.In case want to have wider border, just increase Canvas Size as discussed @ http://photoshopelementsbyadobe.blogspot.com/2011/12/how-to-add-simple-frame-to-photograph.html

3. Appropriate file will be opened in Adobe Camera Raw Dialog.

Of Course Adobe Photoshop Elements is capable of doing such things but if you have full Photoshop version as well, then life is quite easy. Let me share first the way to add rounded Frames in Adobe Photoshop and then explore the possibilities inside Adobe Photoshop Elements. Let go step by step -1. Launch Photoshop, I have CS5 installed and all screenshots shared here are from Adobe Photoshop CS5. There is one trick that we shall not open the file in Photoshop Workspace. We shall open the photograph in Adobe Camera Raw Dialog. So go to File Menu and say Open as - 2. On selecting Open as option, below shown dialog will be shown. In this dialog select Camera Raw option in Second dropdown - 'Open As'3. Appropriate file will be opened in Adobe Camera Raw Dialog.Just for your reference, let's also look at Adobe Camera Raw dialog in Adobe Photoshop Elements. Note the processing controls shown on right side. Elements has limited access to Adobe Camera Raw Functionality.4. Go to Effects Tab in Adobe Camera Raw Dialog.5. Here we have two sections and we have to go to second section - 'Post Crop Vignetting'. Move all Sliders to left-most point. (Amount, MidPoint, Roundness, Feather etc )6. Here you have a rounded Frame now. Just open this file in Photoshop and save as a new JPEG. You are done.In case want to have wider border, just increase Canvas Size as discussed @ http://photoshopelementsbyadobe.blogspot.com/2011/12/how-to-add-simple-frame-to-photograph.html

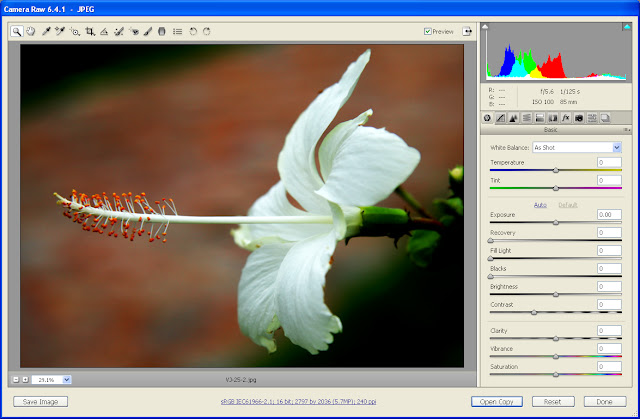
Just for your reference, let's also look at Adobe Camera Raw dialog in Adobe Photoshop Elements. Note the processing controls shown on right side. Elements has limited access to Adobe Camera Raw Functionality.

Of Course Adobe Photoshop Elements is capable of doing such things but if you have full Photoshop version as well, then life is quite easy. Let me share first the way to add rounded Frames in Adobe Photoshop and then explore the possibilities inside Adobe Photoshop Elements. Let go step by step -1. Launch Photoshop, I have CS5 installed and all screenshots shared here are from Adobe Photoshop CS5. There is one trick that we shall not open the file in Photoshop Workspace. We shall open the photograph in Adobe Camera Raw Dialog. So go to File Menu and say Open as - 2. On selecting Open as option, below shown dialog will be shown. In this dialog select Camera Raw option in Second dropdown - 'Open As'3. Appropriate file will be opened in Adobe Camera Raw Dialog.Just for your reference, let's also look at Adobe Camera Raw dialog in Adobe Photoshop Elements. Note the processing controls shown on right side. Elements has limited access to Adobe Camera Raw Functionality.4. Go to Effects Tab in Adobe Camera Raw Dialog.5. Here we have two sections and we have to go to second section - 'Post Crop Vignetting'. Move all Sliders to left-most point. (Amount, MidPoint, Roundness, Feather etc )6. Here you have a rounded Frame now. Just open this file in Photoshop and save as a new JPEG. You are done.In case want to have wider border, just increase Canvas Size as discussed @ http://photoshopelementsbyadobe.blogspot.com/2011/12/how-to-add-simple-frame-to-photograph.html

4. Go to Effects Tab in Adobe Camera Raw Dialog.

5. Here we have two sections and we have to go to second section - 'Post Crop Vignetting'. Move all Sliders to left-most point. (Amount, MidPoint, Roundness, Feather etc )


6. Here you have a rounded Frame now. Just open this file in Photoshop and save as a new JPEG. You are done.

In case want to have wider border, just increase Canvas Size. 

Trending Post Today !

How to reach Kasol/Malana and top things to do around this stunning hill-station of Himalayan State of India

Main places to see & Top things to do around Dalhousie : Stunning Hill Station in Himalayan State of India