How to add simple frame to a photograph in Adobe Photoshop Elements

In last post on this blog, we learned about using default frame templates in Adobe Photoshop Elements and it's one of the easiest methods to get creative frames around your photographs. But many times, people like simple frames in plain colors. Let's have a look at quickest method of adding a simple frame  to photographs in Adobe Photoshop Elements.

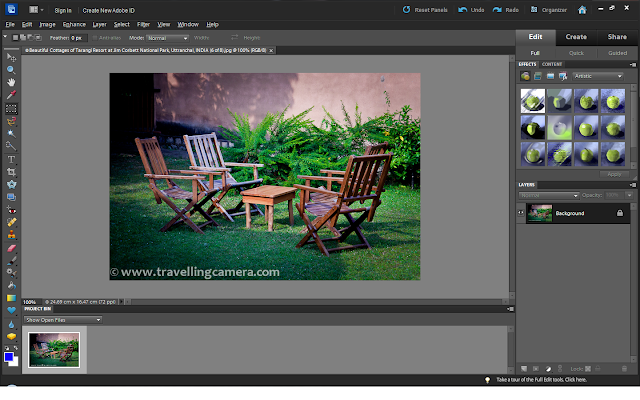
1. Simply open a photograph in Editor application of Adobe Photoshop Elements.

In last post on this blog, we learned about using default frame templates in Adobe Photoshop Elements and it's one of the easiest methods to get creative frames around your photographs. But many times, people like simple frames in plain colors. Let's have a look at quickest method of adding a simple frame  to photographs in Adobe Photoshop Elements1. Simply open a photograph in Editor application of Adobe Photoshop Elements. 2. Now go to Image Menu as shown in the image below and click Resize and opt for Canvas Size resizing.3. Following dialog is shown on selecting Canvas Resizing option under Image Menu. This dialog allows us to expand the size of canvas. Without going much into details of this dialog, I will simply share the steps we need to follow for adding frame.3(a) - Check the option for Relative resizing.3(b) - Mention appropriate values in Width and Height. I have set 1 cm in Width and same in Height. If you are more comfortable with pixels, different options are available in the dropdown next to it.3(c) - Select appropriate 'Canvas Extension Color'. I opted for Black and Clicked OKHere is what I finally got. After this, if you feel that width is less, same method can be used on top of it. If it looks wider that expected, simply cropHope it works smoothly for you as well !!!


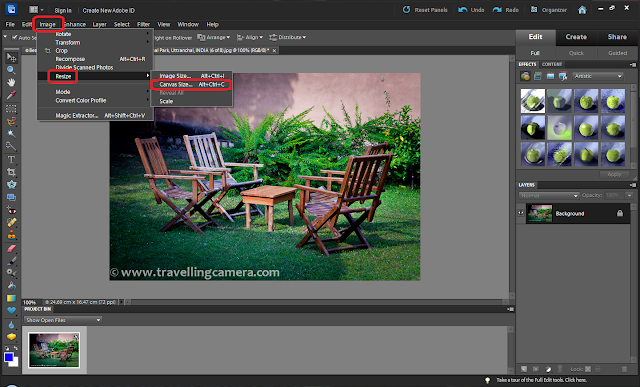
2. Now go to Image Menu as shown in the image below and click Resize and opt for Canvas Size resizing.

In last post on this blog, we learned about using default frame templates in Adobe Photoshop Elements and it's one of the easiest methods to get creative frames around your photographs. But many times, people like simple frames in plain colors. Let's have a look at quickest method of adding a simple frame  to photographs in Adobe Photoshop Elements1. Simply open a photograph in Editor application of Adobe Photoshop Elements. 2. Now go to Image Menu as shown in the image below and click Resize and opt for Canvas Size resizing.3. Following dialog is shown on selecting Canvas Resizing option under Image Menu. This dialog allows us to expand the size of canvas. Without going much into details of this dialog, I will simply share the steps we need to follow for adding frame.3(a) - Check the option for Relative resizing.3(b) - Mention appropriate values in Width and Height. I have set 1 cm in Width and same in Height. If you are more comfortable with pixels, different options are available in the dropdown next to it.3(c) - Select appropriate 'Canvas Extension Color'. I opted for Black and Clicked OKHere is what I finally got. After this, if you feel that width is less, same method can be used on top of it. If it looks wider that expected, simply cropHope it works smoothly for you as well !!!

3. Following dialog is shown on selecting Canvas Resizing option under Image Menu. This dialog allows us to expand the size of canvas. Without going much into details of this dialog, I will simply share the steps we need to follow for adding frame.

In last post on this blog, we learned about using default frame templates in Adobe Photoshop Elements and it's one of the easiest methods to get creative frames around your photographs. But many times, people like simple frames in plain colors. Let's have a look at quickest method of adding a simple frame  to photographs in Adobe Photoshop Elements1. Simply open a photograph in Editor application of Adobe Photoshop Elements. 2. Now go to Image Menu as shown in the image below and click Resize and opt for Canvas Size resizing.3. Following dialog is shown on selecting Canvas Resizing option under Image Menu. This dialog allows us to expand the size of canvas. Without going much into details of this dialog, I will simply share the steps we need to follow for adding frame.3(a) - Check the option for Relative resizing.3(b) - Mention appropriate values in Width and Height. I have set 1 cm in Width and same in Height. If you are more comfortable with pixels, different options are available in the dropdown next to it.3(c) - Select appropriate 'Canvas Extension Color'. I opted for Black and Clicked OKHere is what I finally got. After this, if you feel that width is less, same method can be used on top of it. If it looks wider that expected, simply cropHope it works smoothly for you as well !!!

3(a) - Check the option for Relative resizing.
3(b) - Mention appropriate values in Width and Height. I have set 1 cm in Width and same in Height. If you are more comfortable with pixels, different options are available in the dropdown next to it.
3(c) - Select appropriate 'Canvas Extension Color'. I opted for Black and Clicked OK.

In last post on this blog, we learned about using default frame templates in Adobe Photoshop Elements and it's one of the easiest methods to get creative frames around your photographs. But many times, people like simple frames in plain colors. Let's have a look at quickest method of adding a simple frame  to photographs in Adobe Photoshop Elements1. Simply open a photograph in Editor application of Adobe Photoshop Elements. 2. Now go to Image Menu as shown in the image below and click Resize and opt for Canvas Size resizing.3. Following dialog is shown on selecting Canvas Resizing option under Image Menu. This dialog allows us to expand the size of canvas. Without going much into details of this dialog, I will simply share the steps we need to follow for adding frame.3(a) - Check the option for Relative resizing.3(b) - Mention appropriate values in Width and Height. I have set 1 cm in Width and same in Height. If you are more comfortable with pixels, different options are available in the dropdown next to it.3(c) - Select appropriate 'Canvas Extension Color'. I opted for Black and Clicked OKHere is what I finally got. After this, if you feel that width is less, same method can be used on top of it. If it looks wider that expected, simply cropHope it works smoothly for you as well !!!

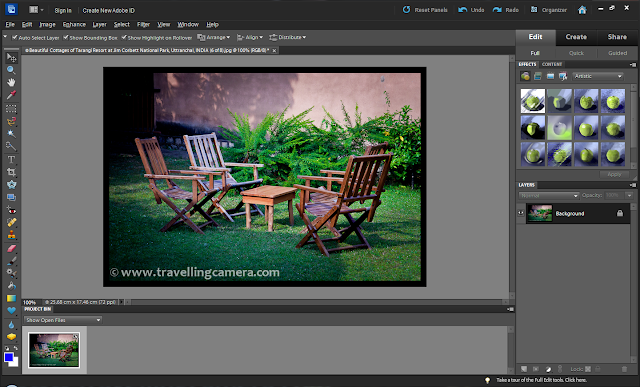
Here is what I finally got. After this, if you feel that width is less, same method can be used on top of it. If it looks wider that expected, simply crop.

Hope it works smoothly for you as well !!!

Trending Post Today !

How to reach Kasol/Malana and top things to do around this stunning hill-station of Himalayan State of India

Main places to see & Top things to do around Dalhousie : Stunning Hill Station in Himalayan State of India