DESCRIPTION:
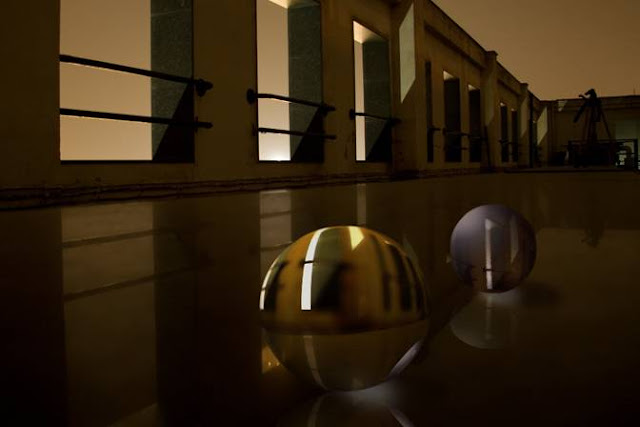
The above image shows two glass marbles with reflection of the background.
- Bigger Glass Marble: It is transparent with no color and reflects the background and the smaller marble behind it. Since this marble is nearer to the viewer & is transparent, the background plane can be seen through it. So it reflects the background and the transparent view of the plane on which it’s lying. We can also see it’s reflection, shadow & refraction on the plane where it is lying.
- Smaller Glass Marble: It is a transparent marble with a light color. It has reflection of a smaller area behind it. We can also see its complete reflection, shadow & refraction on the plane where it is lying.
How this is created:
This image has been created using photograph shown below and some editing in Photoshop CS3.
- Created a background layer of the above photograph (This photograph has been shot on the terrace and it also has a reflection on the benches made up of granite black stone. This has been shot in very low light conditions (at around 8:00 pm).)
- Cropped one portion of the other instance of this photograph.
- After taking the cropped image, I applied some effects to make it look spherical:
- Filter > Distort > Spherize
- Then selected the Sphere from the image (SHIFT + Elliptical Marquee Tool)
- Right-clicked the selected area and selected the ‘select inverse’ option
- Deleted the redundant part >> Now it looks like a rough sphere with transparent area around it.
- After that I again selected ‘inverse select’ and the sphere was selected
- Select > Save Selection : FULL
- Select> Modify> Contract > x pixels
- Select > Save Selection : X
- Select > Load Selection : FULL
- Select > Load Selection : Subtract X
- Blurred the selected area & continued the incremental blur towards the centre but till the halfway or less than that.
- Used Filter>Render>Lightening Effects & Filter>Render>Lens Flare to give shine to the rough Sphere.
- Applied Filter >Texture > Stained glass
- Copied the selected sphere and pasted this on the background layer of first image (Refer step-1)
- Adjusted the Opacity of this layer.
- Applied different Layer styles to make it a bit colorful and more spherical
- Now created a duplicate layer of the layer having small sphere/marble.
- Edit> Transform> Flip Vertical
- Now resized the sphere and placed it below the original sphere.
- Adjusted the transparency to make it reflect the original Marble.
- After this I created a shadow for this marble:
- Again created a duplicate layer of original marble
- Edit> Fill > Black at 100% opacity
- Now resized and placed appropriately
- Did incremental blur to make it look like a shadow. Initially it looked like an ellipse.
- To create the Refraction: When we place a metallic or glass object under light there we see a shiny refraction of bright light below the object. So this is also created in same way as I created shadow. Apart from that I used Used Filter>Render>Lightening Effects & Filter>Render>Lens Flare. Then I used incremental blur.
- Now it was the turn to create another marble with no color. I had to show the reflection of the small marble in it. So used the latest PSD and cropped it such that the small marble was also a part of the resulting image. Overall process of creating this marble was the same apart from the following changes:
- Spherize is used 3 times to improve the spherical feel of the marble.
- Used a bit high opacity to show some part of the plane behind it. Since it is colorless, its head should be shiny but not colorful as we had made for the small marble.
- Reflection, Shadow, & the refracted light was created in same manner.
- At last I played with some layer styles to give the final touch to this creation.
- So finally here is the photoshopped creation with a lot of reflections in it.
Original Image used is :


.jpg)
Comments